Showing posts with label Shellie. Show all posts

Tuesday, July 31, 2012

The "Shelles" Freezer Cook Together

My little helper in the kitchen...isn't she sweet?!?!?!

Shellie has been wanting to stock her freezer with meals for her family, but it seems life keeps getting in the way. She even bought ingredients for a freezer cooking session, but life kinda spun out of control with her oldest in the hospital with a staph infection- CRAZY! He is all better now- praise the Lord!

Here is what we decided to cook: (If it's underlined, click on it and the recipe is linked up for you!) 
I put the menu up here first in case  you just want recipes, and don't want all the chatter....  ;)

Waffles

Best Ever Chicken Marinade (at least so far)

Chicken Ranch Tacos- My family actually likes these on sandwich buns and sprinkled with a little mozzarella cheese.

Mexican Chicken Casserole- We are still deciding of this one needs to be assembled the day of cooking. Layer tortilla shells, chicken mixture, tortilla shells, chicken mixture, top with cheese. Shellie made it all layered and frozen and it seemed a little "mushy."

Sweet and Spicy Grilled Chicken- Summer on the grill!!!!

PB&J Sandwiches

No Boil Manicotti- Doesn't this picture of Shellie'e little guy say it all?!?!?

P.S. This is her "picky" eater...2 thumbs up means it is being added to the next menu ASAP!


Shredded BBQ Chicken- we just took the leftover shredded chicken and dumped in Sweet Baby Ray's BBQ sauce and froze.

Crockpot BBQ Chicken- So simple and so delicious.

Garlic Parmesan Chicken- This is my family's absolute FAVE chicken. I make it in nuggets, too.

Grilled Cilantro Lime Chicken- Another great grilling recipe for the summer.

Jo Mama's Spaghetti Sauce- This sauce is CRAZY good! I didn't use the wine just added a grape juice and a little vinegar. We like our sauce sweet; Shellie prefers "tangy." So, when I heated it up in the crockpot the day of serving, I added brown sugar to taste!  YUMMY!


We were getting ready to spend a day scrapbooking for our birthdays (our birthdays are just a few days apart.)  We got this brilliant idea to start the evening before at my house and do a little freezer cooking.  Turns out...this idea was PURE GENIUS! We already have another day scheduled.  So, if you can, get a friend and plan an evening and FILL YOUR FREEZER.  We got started about 4:30 and wrapped up around 9:30. (Cleaned up, finished, packed up, ready to scrapbook!)

What I loved about cooking together:
Our family sizes are identical, so portions were the same.
We were at my house, so when I had to stop to take care of my girlies, she could keep on cooking.  I think THAT was the secret to getting things done so quickly.
MOST OF ALL, cooking with a friend just made it FUN!"

First up, we had to decide on a menu. This was probably the hardest part, because you have to find meals that BOTH families will agree on. We both have a picky eater, as I am sure almost every family does.


Here is how we did it.
I went shopping the day before, so that was done. The morning that we were cooking, I filled a crockpot full of chicken breast seasoned with garlic pepper, dried minced onion, and a little chicken broth. I cooked that on high all day until we were ready to shred it.  I also, put the ingredients for the sauce in the crockpot and cooked that on low all day. (We later decided, that wasn't really necessary, since we both like to cook it in the crockpot the day we serve it anyway.)


When you cook your chicken in the crockpot, it is soooooo easy to shred- ALMOST effortless.

While I was getting my girls their dinner (right before Shellie arrived), I made 2 loaves of bread into pb&j sandwiches.  (That gave us each 10 sandwiches to take home.)

When Shellie arrived, we started with the Garlic Parmesan Chicken since it needed to lay flat in the freezer before freezing in bags, and of all the meals, it was the most time consuming.
After that, we just went down the list according to meat type- shredded chicken or assemble frozen, I tried to keep ahead of Shellie trimming the chicken.  (I am a tad whack-o about ANY fat on my chicken, so I trim ALOT!)
Garlic Parmesan Chicken.  We froze it on cookie sheets lined with waxed paper, once frozen transferred to freezer bags.  What  you see here, is what went in the 'fridge because my kids ALWAYS want this meal first when I freezer cook.


While Shellie made waffles, I made the manicotti. Once that was all done, we put the sauce into containers. Cleaned up the kitchen and gave each other a high five!
2 waffle irons going at the same time.

The sauce in the containers.

When we were done, we had at least 13 meals made PLUS spaghetti sauce, waffles, and pb&j. We were all smiles and feeling NO GUILT as we left to scrapbook the next day away!

Here we are the next morning, ready to scrapbook the day away!!!


Here are some other pics we took of the process:
Before I start cooking, I hang up all the recipes on  my cabinets above where I will be making those recipes. Stove top recipes bu the stove, crockpot recipes on the counter where my crockpots are...you get the picture.


 Once we finished a recipe, we moved it to a cabinet so that we could see our process- it feels like checking off a To Do List.

DONE!


Still trimming chicken....


PB&J ready for the freezer!
Mixing up the sauce for the Crcokpot BBQ chicken.  This one is great on the grill, too...just a summer FYI. ;)
the No Boil Manicotti was so easy to fill using a ziploc bag (that I "mixed/squished" the ingredients in), cut a small hole in the tip and squeezed to fill. AWESOME!
This is how we freeze anything with a marinade...dump it all in a bag. I know, it isn't a cooked meal in the freezer, but the hard part is all done, you just have to throw it on the grill, crockpot, etc...
Did I mention that the night before I was up ALL NIGHT with 9 ten year olds for my daughters big birthday...I sent her in her room to read, because she was ummmm...tired... ;) a few minutes later, this is how I found her- ASLEEP with her Kindle!

That's it for us!  Fill your freezer and bless your families (and you, too!)

Thursday, May 10, 2012

Teacher Appreciation

So this week is teacher appreciation week and I wanted to do something other than Apple themed, lotion or candles. So I headed to my favorite spot Pinterest to get some ideas. I find so many things there then just take them and modify them to my taste. I never know how they will turn out.


For this project I bought glass jars the large ones are for the main teachers and smaller ones for specials.
I bought candy to use match my message.

I'm EXTRA happy to have you for a teacher. Don't SNICKER, but I think your great! You are MOUNDS of fun and have brought me so much JOY. I think you ROCK. Thanks for always being so JOLLY and helping me become such a SMARTIE. Teachers like you are worth a MINT. You are MIGHTY MAGNIFICENT. Thanks for all you do, you deserve a big PAYDAY!


I filled the jars with the candy trying to line it up around the sides in the order it was mentioned used  in message. After that I filled the center with extra candy, trying to put at least two of each bar.


Once the jars were filled I printed out my labels and inked around the edges to ad just a little extra color. I attached them to the jar  using double sided tape. Next I choose large flowers for the top of jars, using  brads and buttons for the center of the flower. Then I used stickles (one of my fave things) to add a little bling around the lid. There you have it!

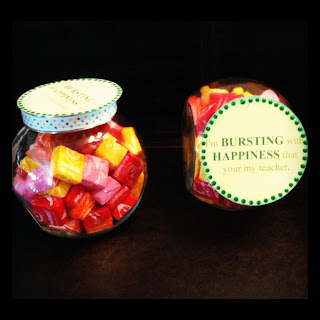
The smaller jars were really simple. I filled them with Starburst, used ribbon around the edge of the lid and used my message as the decoration for the top of the lid.


I'm BURSTING with
HAPPINESS that your
my teacher.


That's it :) Happy Crafting!

Saturday, February 25, 2012

Card Binder

Ok, so Michelle and I have tons of cards we have made and we always like to save one of each card for future reference. Whether we make them together or separate. I was trying to figure out an easy way to display them for quick reference and I came up with this. I decided to use one of my 3 ring binders with sheet protectors. I just mounted the cards on a piece of cardstock, slid them in sheet protectors and there you have it. A easy grab solution to sorting through the piles or boxes. Later I am planning on adding the recipes for each card so I have those on hand as well.
If you have any ideas for a better way to store your cards, I am always open for suggestions. Thanks for reading.

Hello Kitty

I just made a quick birthday card tonight to add to my stock pile. I like having cards on had when the occasion arises. This card I made using left over cutouts from a previous project. I just didn't have the heart to throw the extra ones away. I usually end up giving them to my daughter for her scrapbooking pile. LOL I have to say she is getting quite a collection. You will see more about that as I continue organizing my scrapbooking room.


Card recipe

Hello Kitty cut @ 3"
Card 4 1/2 x 6
Rub Ons for heart, flowers and Happy Birthday
Large Brad for extra embellishment

Thursday, February 16, 2012

Birthday Party

It's finally over... Hailey's 8th Birthday Party Sleepover, and let me just say I am tired! Who knew 8 little girls could wear a person out so much? Well, in all honesty Michelle and I know that very well but have decided that the smiles that appear on our children's faces make it worth it! Now Michelle already showed you the invitations but I'm just going to attach them again to complete this post.
I love how they turned out! (Good job, Michelle)
After invitations were complete off to Pinterest http://pinterest.com/ we went to find ideas for decorations, cakes, and games. Let me just say I love love love Pinterest! With the sleepover theme it was easy to decide on decorations. I set a table to make it look like a bed with pillows and blankets. Then on top of blankets I scattered all kinds of candy. The girls thought they had entered a candy store; they even played a real life Candyland game. I know the parents were thanking me the next day for all the sugar :) shhh.
I decided to make Hailey a special birthday shirt to wear to school. I bought just plain shirts to decorate with fabric I cut out with my Cricut. This turned out to be a little more challenging that I had thought, but this was my first attempt at cutting fabric. After some trial and error, I ended up with a great shirt.
First, I did some practice cuts on scrap paper to make sure my sizes weren't off. I thought I had decided on the design I wanted but you will see that as I work on projects they tend to change into something totally different most of the time.
Before you cut your fabric you need to purchase an item called Heat n Bond. You will Iron this onto your fabric giving it a more stickable texture to help it adhere to the Cricut mat. make sure you use a clean sticky mat for fabric cuts, and a new Cricut blade. If you mark your blade with a F for fabric it will help you remember which is which. After fabric is cut just iron it on. Then for some extra touches I used stickles tracing around edges.
For Hailey's treat for class she wanted to take homemade Melting Snowman cookies. These are so easy. I was short on time so I took the easy way out with pre packaged sugar cookies.....come on it was already 2:15am I was tired.
Melting Snowman Cookies
Cut into 1/2 slices and bake according to package.
(They don't have to be perfectly round you want them to look a little messy)
Next I used a mixture of Cookie Icing and Whipped Vanilla Icing and mixed it together then microwaved it for about 8 sec to help drizzle on cookies. You want icing to run off the sides and look sloppy.
For the head of the snowman I used large marshmallows and microwaved them for about 6 secs then took them out and cut in half and placed sticky side on cookie . Press down a little to make it look smushed.
Finally decorate faces and body with different color icing.
Now the Cake... Hailey choose the one she wanted on Pinterest. This was my first try at piping a cake and I think it turned out pretty good. The cake had four layers top one yellow, two middle ones just a hint of cherry and the bottom layer was cherry. For the cherry flavor and color I used koolaid. for the icing I made a homemade buttercream icing for sides and vanilla icing for top. I have to say this was one of my best tasting cakes ever. It was a big hit!
Breakfast the next morning I made pancakes and used food coloring in the batter and the girls thought it was the coolest thing ever. Overall, I think that the party was a great success.

Wednesday, February 15, 2012

Super Princess Valentine's

For Valentine's day my boys wanted super hero valentines. This is due in part to the fact that my husband still dreams of one day becoming a superhero. When he was a kid he would dress up in yellow pants, shirt and cape and he became Yellow Man... he had the power of yellow. I'm still not sure what that power is and Norm won't tell me what that means? LOL My boys now are in love with all superheros. At any given moment, you will see my youngest son Connor in yet another costume. Hailey, on the other hand, is a mixture of both wanna be superhero and princess.
Hailey choose butterflies for her Valentines.
Yet again to get ideas for almost anything I head to Pinterst. Hailey's valentine was made with Cake Basics cricut cartridge, for the butterfly outline cut at 5 1/2 inches and George Basic Shapes for the circle and heart. I used my Gypsy to cut out everything so I didn't have to punch out the hearts or circles. I just set images overtop of each other to make cuts. After the butterflies were cut out I folded them in half without creasing them and made two slits to slip the sucker stick through. Glue your circles on and write your message and you're done.


Both boys wanted the same valentine so this made it easier on me. For the cape and mask I used my Superman Cricut cartridge. Then on both valentines I put the boys initials on the back of the cape. For the hole in the cape, you could use a hole punch. If you have the Gypsy like me, I just overlapped my cuts to make a circle at the top of the cap. That's it pretty simple.